 1.
1. Open the image for editing.
 2.
2. Duplicate the current layer and change the blending mode of the new layer to Screen.
 3.
3. Use the Levels tool (Ctrl+L) to apply the following properties:
Input Levels: 0, 0.1, 255
 4.
4. Apply a Radial Blur filter (Filter> Blur> Radial Blur) with the following properties:
Amount: 100
Blur Method: Zoom
Quality: Best
Blur Center: Adjust the position to define the location of the light source. This setting will affect the direction of the rays.
 5.
5. Apply an Auto Levels (Ctrl+Shift+L).
 6.
6. Duplicate the current layer several times to increase the visibility.
 7.
7. Rollover the image in this step to see the image before this Photoshop technique was applied.
 1. Open the image for editing.
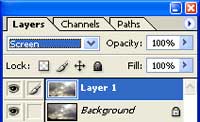 2. Duplicate the current layer and change the blending mode of the new layer to Screen.
 3. Use the Levels tool (Ctrl+L) to apply the following properties:
  4. Apply a Radial Blur filter (Filter> Blur> Radial Blur) with the following properties:
  5. Apply an Auto Levels (Ctrl+Shift+L).
 6. Duplicate the current layer several times to increase the visibility.
 7. Rollover the image in this step to see the image before this Photoshop technique was applied.
0 cemuhan:
Post a Comment
Segala komen dari anda amatlah dihargai :)